
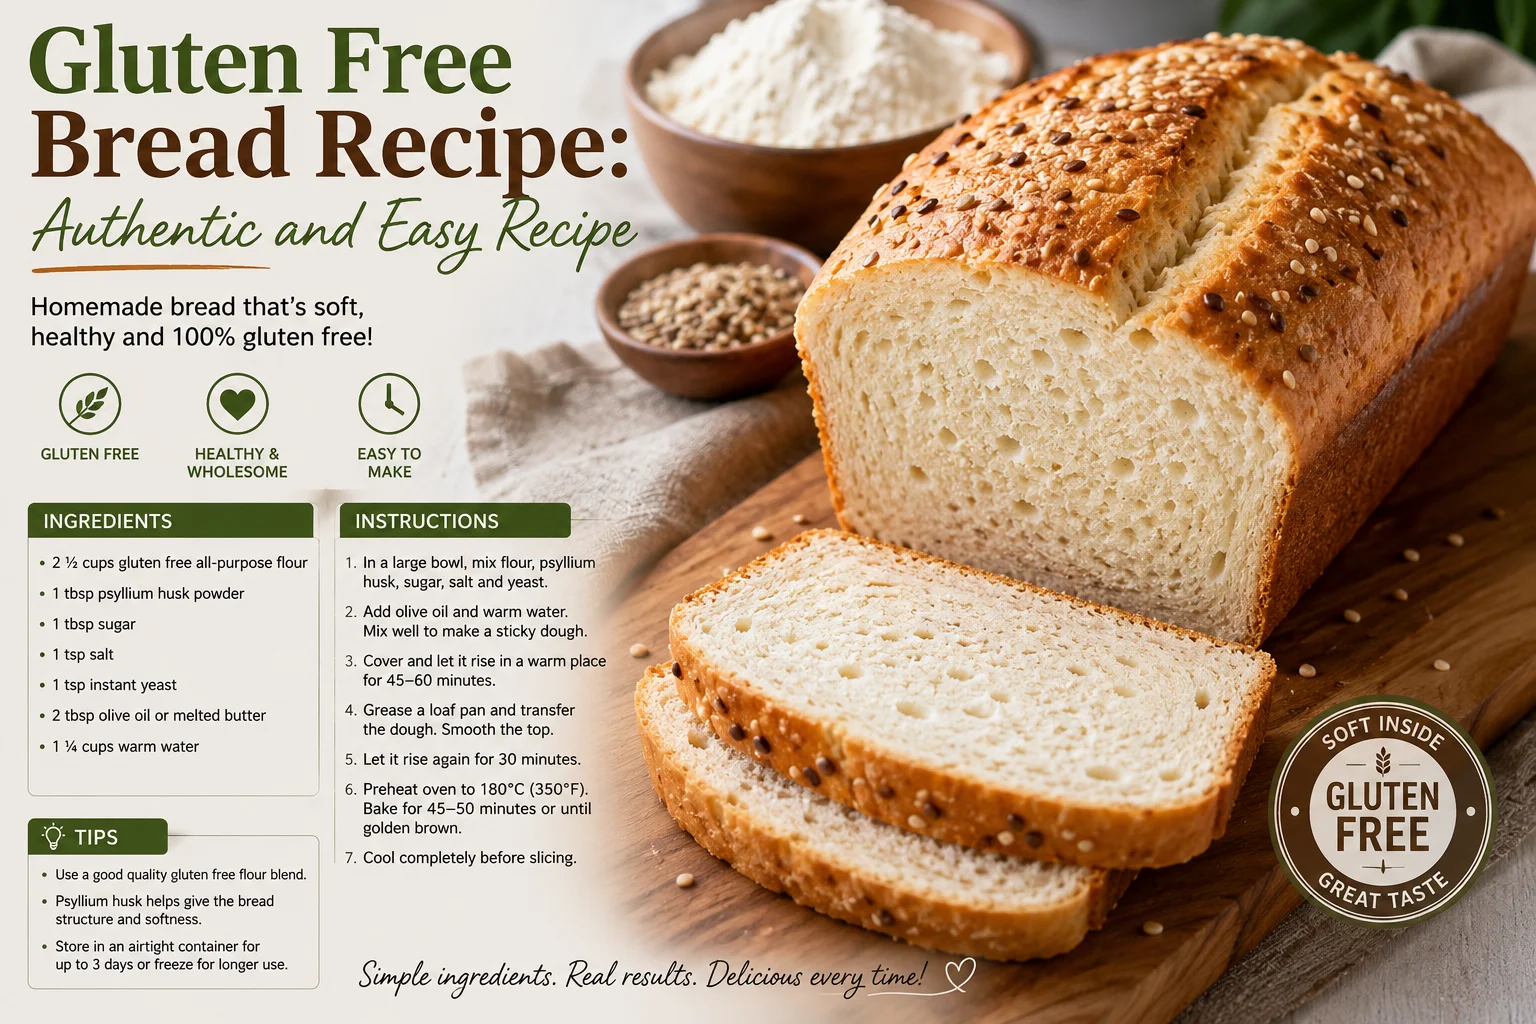
Baking gluten-free bread at home has long had a reputation for being frustrating. Many homemade loaves turn out dense like bricks, dry and crumbly, or gummy in the center. However, achieving an authentic, artisan-style loaf—with a golden, crispy crust and a tender, bendable crumb—does not require commercial additive packages or professional bakery equipment.
Gluten-Free Bread Works
To make great gluten-free bread, it helps to understand what gluten normally does in traditional baking. Gluten is a network of proteins (gliadin and glutenin) found in wheat, rye, and barley. When hydrated and kneaded, gluten forms an elastic web. This web traps the carbon dioxide gas produced by yeast, allowing the dough to stretch, rise, and hold its shape.
When you bake without wheat flour, you lose that built-in structural web. Gluten free doughs cannot be kneaded in the traditional sense because there is no gluten network to stretch or align. Instead, gluten-free bread relies on three structural pillars:
- Hydrocolloids (Binders): Ingredients like xanthan gum or psyllium husk powder act as synthetic gluten. They trap moisture and create an elastic gel structure that holds gas bubbles produced by the yeast.
- Protein and Starch Balance: A mixture of grain flours (like brown rice, sorghum, or oat flour) provides structure and flavor, while starches (like tapioca starch or arrowroot) provide lightness, lift, and soft elasticity.
- Higher Hydration: Gluten-free flours absorb significantly more water than wheat flour. Consequently, gluten-free bread batter closely resembles thick cake batter or sticky porridge rather than traditional shapeable dough.
Ingredients Breakdown: What You Need and Why
Using the right ingredients—measured accurately by weight—is the single most important factor in achieving consistent results.
The Dry Foundation
- 1-to-1 Gluten-Free Baking Flour Blend (360g / ~3 cups): Choose a high-quality commercially available blend containing rice flour, starches, and xanthan gum (such as Bob’s Red Mill 1-to-1 or King Arthur Measure for Measure). If your blend does not contain xanthan gum, add 1 teaspoon of xanthan gum separately.
- Instant Yeast (7g / 1 packet): Instant (or rapid-rise) yeast works best because it can be mixed directly into dry ingredients and reacts quickly with high-hydration batters.
- Granulated Sugar or Honey (15g / 1 tbsp): Acts as food for the yeast to accelerate fermentation and aids in crust browning via the Maillard reaction.
- Fine Sea Salt (7g / 1 tsp): Essential for flavor development and for regulating yeast activity so the bread doesn’t rise too quickly and collapse.
- Psyllium Husk Powder (10g / ~1.5 tbsp, Optional but Recommended): Adding psyllium husk powder gives the crumb an authentic, chewy stretch that prevents crumbling when sliced.
The Liquid & Emulsifier Network
- Warm Water (360ml / 1.5 cups): Water temperature should be between 105°F and 110°F (40°C–43°C). Liquids that are too hot kill the yeast; liquids that are too cold delay rising.
- Whole Eggs (2 large, room temperature): Eggs provide structural stability, protein structure, and rich flavor.
- Apple Cider Vinegar or Lemon Juice (1 tsp): The mild acidity relaxes the starch network and strengthens the yeast, helping the loaf achieve a better rise.
- Melted Butter or Neutral Oil (45ml / 3 tbsp): Fat coats the starch granules, keeping the crumb soft and extending the shelf life of the bread over several days.
Step-by-Step Master Recipe: Authentic Gluten-Free Sandwich Loaf
Follow these exact steps to prepare, rise, and bake your loaf.
- Prep Time: 20 minutes
- Rise Time: 45 to 60 minutes
- Bake Time: 50 to 60 minutes
- Yield: 1 standard loaf (approx. 12–14 slices)
Prepare the Pan and Equipment
Crucial for preventing sticking and ensuring uniform rising.
- Grease a standard 8.5 x 4.5-inch metal loaf pan with butter or oil. Line the bottom and longer sides with a strip of parchment paper, leaving an inch of overhang on the sides. This creates a sling that makes removing the hot loaf effortless later
Mix the Dry Ingredients: Incorporate binders and yeast thoroughly.
In the bowl of a stand mixer fitted with a paddle attachment (or a large mixing bowl with a hand mixer), whisk together 360g of gluten-free flour blend, 7g instant yeast, 7g fine sea salt, 15g granulated sugar, and 10g psyllium husk powder until thoroughly distributed.
Combine Wet Ingredients: Target 105°F to 110°F liquid temperature.
In a separate liquid measuring cup, whisk together warm water (360ml), 2 room-temperature eggs, 1 teaspoon apple cider vinegar, and 3 tablespoons of melted (and slightly cooled) butter or oil.
Beat the Batter
Pour the wet mixture into the dry ingredients. Beat on medium-low speed for 1 minute to combine, then increase to medium-high speed for 3 to 4 full minutes. Because there is no gluten to overwork, vigorous beating forces the xanthan gum and psyllium husk to absorb liquids and form a thick, smooth, sticky batter.
Transfer and Smooth the Surface
Spoon the sticky dough into your prepared loaf pan. Dip a spatula or your fingers into warm water and smooth the top surface into a uniform, slightly rounded mound. Note: Gluten-free bread will retain whatever top shape it has before going into the oven.
Single Proofing (Rise)
Cover the pan loosely with a piece of oiled plastic wrap or a damp kitchen towel. Place in a warm location (around 75°F–80°F / 24°C–27°C). Let the dough rise until it reaches about 1/2 inch above the rim of the pan. Do not overproof; if the dough rises too high, it will collapse in the oven.
Bake to Temperature
Preheat your oven to 375°F (190°C). Remove the cover and place the loaf pan on the middle oven rack. Bake for 50 to 60 minutes. If the top browned too quickly around the 30-minute mark, tent a piece of aluminum foil loosely over the top. The bread is fully baked when an instant-read thermometer inserted into the center reaches 205°F–210°F (96°C–99°C).
Cool Completely Before Slicing
Remove the loaf from the oven and let it sit in the pan for 10 minutes. Use the parchment paper sling to lift the bread onto a wire cooling rack. Allow the loaf to cool completely to room temperature (at least 2 hours) before slicing. Slicing warm gluten-free bread releases trapped steam prematurely, turning the crumb gummy.
Pro-Tips for Gluten-Free Bread Success
| Common Issue | Cause | Solution |
| Gummy Center | Sliced while warm, or underbaked | Always cool completely for 2 hours; verify internal temperature reaches 205°F–210°F (96°C–99°C). |
| Loaf Collapsed in Oven | Overproofed or too much liquid | Reduce rise time by 10 minutes; do not let dough rise more than 1/2 inch above the pan rim before baking. |
| Crumbly Texture | Lack of binders or inaccurate flour measurement | Use a digital scale to weigh flour; ensure xanthan gum or psyllium husk powder is present in the recipe. |
| Dense / Heavy Crust | Dough too dry or oven temperature too low | Ensure water temperature is accurate and do not add extra flour to make a moldable dough. |
Storage and Freezing Instructions
Gluten-free bread stales faster than wheat bread because the starches undergo retrogradation (crystallization) more rapidly.
- Room Temperature (Days 1–2): Store the cooled loaf wrapped tightly in a plastic bag or linen bread bag at room temperature. Slice only as needed to preserve moisture.
- Toasting (Days 3–4): By day three, slices will benefit from a light toasting, which re-gelatinizes the starches and restores a soft interior with a crisp edge.
- Freezing (Up to 3 Months): Pre-slice the entire loaf once cooled. Place parchment paper strips between slices, then transfer to a freezer-safe zip-top bag. Toast frozen slices directly from the freezer—no thawing required.
Q: Why is my gluten-free bread gummy or wet in the middle?
A: This usually happens for two reasons: slicing the bread while it is still warm or underbaking it. Gluten-free bread relies on starches that must set as steam escapes during the 2-hour cooling process. Always check that the internal temperature reaches 205°F–210°F (96°C–99°C) with a digital thermometer before removing it from the oven, and wait until it is fully cooled to slice.
Q: Can I make this recipe egg-free or vegan?
A: Yes. Replace the 2 large eggs with aquafaba (6 tablespoons of liquid from a canned chickpea tin, whipped until frothy) or 2 flax eggs (2 tablespoons ground flaxseed mixed with 6 tablespoons warm water, rested for 5 minutes). Combine this with melted coconut oil or dairy-free vegan butter.
Q: Why did my bread rise nicely and then collapse in the oven?
A: Overproofing is the primary cause. Gluten-free dough lacks a strong gluten web to hold excessive air bubbles. If allowed to rise higher than 1/2 inch above the rim of the loaf pan, the gas bubbles expand too much, pop in the oven heat, and cause the loaf to sink.
Q: Can I use almond flour or coconut flour instead of the blend?
A: No, not as a direct 1:1 substitute. Nut and coconut flours do not contain the starches required to structure a yeast-risen loaf and absorb liquids at completely different rates. Stick to grain-and-starch based 1-to-1 gluten-free flour blends for this specific recipe.
Q: Can I bake this recipe in a bread machine?
A: Yes. Use the dedicated Gluten-Free setting on your machine (which runs a single mix and single rise cycle, skipping the traditional double-punch-down). Pour liquid ingredients into the pan first, followed by dry ingredients, with the yeast on top.
Q: My dough looks more like batter than traditional bread dough. Did I add too much liquid?
A: No, that is completely normal. Gluten-free bread dough should closely resemble a thick cake batter or wet frosting rather than a shapeable wheat dough ball. Extra hydration is essential for a soft crumb.
Final Thoughts
Baking authentic, delicious gluten-free bread at home is entirely achievable once you embrace the unique science of gluten-free doughs. By relying on weight-based measurements, proper hydration, effective hydrocolloid binders, and complete cooling, you can enjoy fresh, soft, sliceable bread that rivals traditional bakeries.
Leave a Reply